Kdenlive は、プロ品質の動画編集が可能なオープンソースのノンリニア編集ソフトです。カット編集からエフェクト、音声処理、タイトル作成まで幅広く対応できます。
sudo dnf install kdenlive
🎬 Kdenlive の主な機能一覧
✂️ 基本編集機能
マルチトラック編集:複数のビデオ・オーディオトラックをタイムラインで同時に編集
カット・トリム・スプリット:直感的な操作でクリップの分割やトリミングが可能
グループ化・スナップ:複数のクリップをまとめて移動・編集
🎨 映像エフェクトとトランジション
豊富なビデオエフェクト:ぼかし、色補正、クロマキー(グリーンスクリーン)、歪み、ズームなど
トランジション効果:フェード、ワイプ、スライドなどの切り替え効果を簡単に適用
トラック全体へのエフェクト適用:トラック単位でエフェクトを一括適用可能
🔊 音声編集
音声エフェクト:ノイズ除去、イコライザー、リバーブなど
音声波形表示:タイムライン上で視覚的に音声を確認しながら編集
マルチチャンネル対応:ステレオ・モノラルの切り替えやチャンネル分離も可能
🖋 タイトル・字幕
タイトル作成ツール:静的・動的なテキストを動画に追加
アニメーション付き字幕:フェードイン・アウトや移動などの動きも設定可能
📦 メディア管理とプリセット
プロジェクトビン:インポートした素材を整理・分類
ゾーン設定:クリップの一部を「ゾーン」として保存し再利用
ライブラリ機能:よく使うクリップやエフェクトをプリセット化して保存
📽 出力とレンダリング
部分レンダリング:タイムラインの一部だけを選択して書き出し
多様なフォーマット対応:MP4, MOV, AVI, WebM など多数
レンダリングプリセット:YouTube用、スマホ用など用途別に最適化された設定
🧰 その他の便利機能
キーフレームアニメーション:エフェクトや位置の時間変化を制御
プロキシ編集:重い動画でも軽快に編集できる低解像度プレビュー
画面キャプチャ・音声録音:Kdenlive内で録画・録音も可能
GIMP 3.0 以降の場合は「arrow_V3.scm」
ダウンロードした .scm ファイルを、以下のディレクトリに入れる
/home/user/.config/GIMP/3.0/scripts
※ スクリプト配置ディレクトリの探し方(Linux編)
GIMPを起動して、 「編集」→「設定」→「フォルダー」→「スクリプト」 を選ぶと、スクリプトを読み込むフォルダ一覧が表示される。
パスツールで矢印の軌道を描く
ツールボックスから「パスツール」を選んで、矢印の始点と終点をクリックしてパスを作成。
スクリプトを実行
メニューから「ツール > Arrow」を選択。設定画面が出るので、矢じりの長さや角度、線の太さなどを調整して「OK」をクリック!
-maxdepth は「グローバルオプション」って呼ばれていて、検索条件(-type や -name)より前に書く必要がある
find . -maxdepth 1 -type f -name "*.mp4"
count=0 ((count++)) echo "$count" # → 1
ファイル名にスペースが含まれる場合、forループを使うときにlsコマンドは適していません。その理由は、スペースがシェルで分割されてしまい、意図しない挙動を引き起こすためです。
for file in $(ls -v | grep "\.mp4$")
代わりに、findコマンドやwhileループとreadコマンドを組み合わせるのがおすすめです。
#!/bin/bash # .mp4 ファイルを対象に処理 find . -type f -name "*.mp4" | while IFS= read -r file; do clean_file="${file#./}" # 先頭の './' を削除 echo "Processing: $clean_file" # 必要な処理をここに追加 done
${file#./}は、変数の内容を加工するためのパラメータ展開というBashの機能を使っています。
${var#prefix}の形式で、変数varの先頭にあるprefix(文字列)が一致した場合、その部分を削除した結果を返します。
trash-cliのインストール
sudo dnf install trash-cli
ファイルをゴミ箱に移動する
trash-put ファイル名
ゴミ箱の中身を確認する
trash-list
ゴミ箱を空にする
trash-empty
#!/bin/bash # 読み込むファイルを指定 filename="example.txt" # ファイルの中身を1行ずつ読み込んで処理 while IFS= read -r line; do # 各行に対する処理をここで行う echo "Processing: $line" done < "$filename"
IFS= を空文字に設定して、「区切り文字を完全に無効化」する。Bashのreadコマンドは標準的に改行を「行単位の区切り」として扱うので、IFS を空文字にしても、改行で行ごとに区切られる。
コード内で IFS= と設定すると、IFS の値を一時的に空文字に変更します。この設定は、そのスコープ内でのみ適用され、他の部分には影響しません。たとえば、IFS= read -r line の行でのみ有効です。その後、IFS の値は元に戻ります。
なので、グローバルに IFS が変更されることはありませんが、特定のコマンド実行時に一時的に影響を与える仕組みになっています。
タイトル、アーティスト、アルバム名、ジャンルなどの情報を含めることが可能です。
ffmpeg -i input.mp4 -metadata title="タイトル名" -metadata artist="アーティスト名" -metadata comment="コメント" -codec copy output.mp4
個別のデータだけを取得する
mediainfo --Output="General;%Title%" input.mp4
このコマンドはタイトルだけを表示します。また、他のメタデータ(たとえばアーティストや作成日時)を取得したい場合は、%Artist%や%File_Created_Date%などの変数を使って指定可能です。
RPM Fusionリポジトリが必要
パッケージ名の確認
$ sudo dnf search ardour Matched fields: name ardour6.x86_64: Digital Audio Workstation ardour7.x86_64: Digital Audio Workstation ardour8.x86_64: Digital Audio Workstation
$ sudo dnf install ardour8

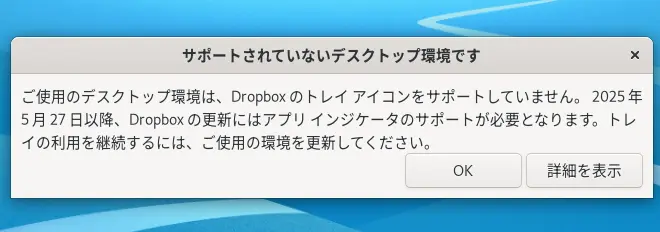
Fedora 42 users can install gnome-shell-extension-appindicator which is already ready for Gnome 48
$ sudo dnf install gnome-shell-extension-appindicator Package Arch Version Repository Size Installing: gnome-shell-extension-appindicator noarch 59-2.fc41 fedora 246.0 KiB Installing dependencies: libappindicator-gtk3 x86_64 12.10.1-5.fc41 fedora 108.6 KiB libdbusmenu x86_64 16.04.0-28.fc41 fedora 540.3 KiB libdbusmenu-gtk3 x86_64 16.04.0-28.fc41 fedora 88.5 KiB Transaction Summary: Installing: 4 packages $ sudo dnf install libappindicator-gtk3